it took a dumb amount of time for me to find the answer™ to the query:
> i just purchased a domain via Cloudflare (used Google Domains but no thanks SquareSpace)
> i set up email for it via Google Workplace, added gmail DNS records (automatically via Workplace setup where it recognizes you’re using Cloudflare and offers to do it for you)
> and of course in Cloudflare set up a 301 redirection rule via page rules
Why isn’t my domain redirecting then?! (Or resolving at all)
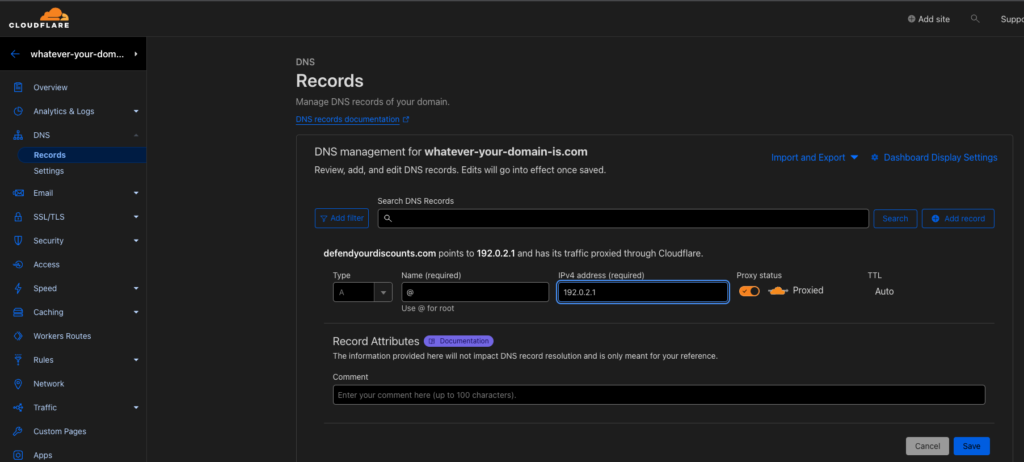
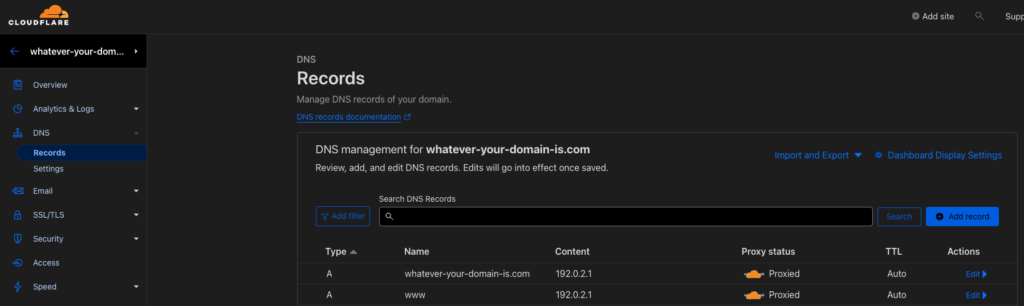
Go into your DNS settings in Cloudflare and add the very important two A records for “@” and “www”
For the IP address, enter 19.0.2.1
Adding the new record(s):
Adding the @ record… You’ll do this twice, once using @ for the hostname and once using wwwWhen you’re done it should have these two records
Wtf is that IP address I’m entering? It’s a dummy Reserved IP address as described in this Cloudflare forum thread by Laudian:
Allows you to snap your windows around. For example, easily snap two windows side by side taking up 50% of your screen width. Or 3 apps at 33.33% full screen…etc.
Terminal replacement with better design/layout options. Probably has other features but haven’t investigated too much. No learning curve assuming you’re already familiar with Terminal.
Allows me to connect multiple bank accounts and set up simple rules for automated transfers between accounts. One of my favorites. For example, are you a freelancer? Create a routine to automatically transfer 30% of each incoming payment in your business checking account to set aside in your savings account for tax purposes.
How I outperformed BuiltWith and PublicWWW’s free plans with a couple hours and 30 lines of code.
What if you wanted to find a list of websites that are using a specific piece of technology? Like if you wanted a list of all websites using WordPress? Or in my case, all websites built with Shopify?
You might turn to BuiltWith or PublicWWW. These sites scan the source code of websites to determine the technology the website is built on.
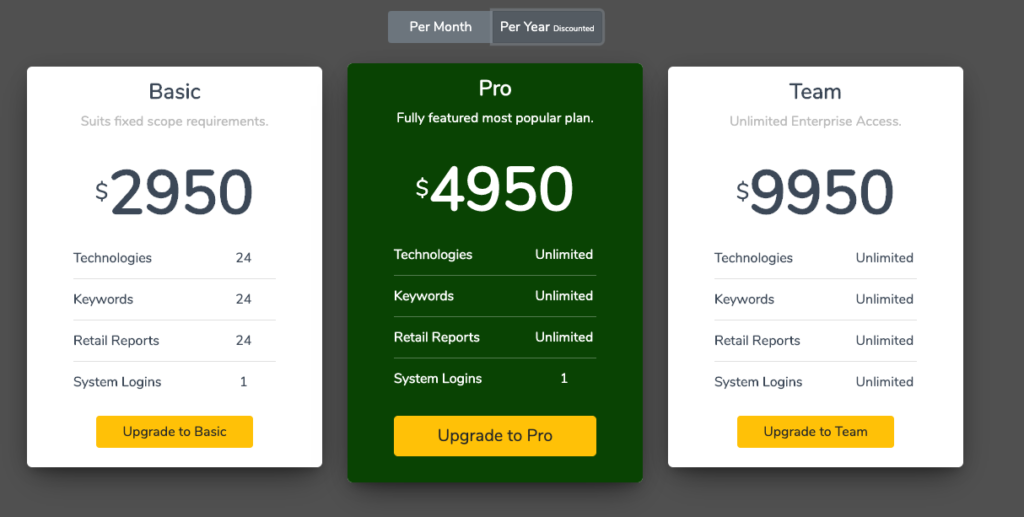
Very useful and cool. Until you see the pricing pages:
Now, let me just say – I get it.
The work they’re doing ain’t easy, and the pricing is justifiable, but since I can code, how about I just build my own for free?
The way I see it, this problem has two components:
I need a script that can automatically check, when supplied a website domain, if that website is using Shopify or not.
I need a really big list of website domains to run the first script against.
Once I have both of those pieces, I can put them together to make my Bootleg Builtwith.
Part 1: Determining if a certain website uses Shopify
Let’s start with the first component: When given a website URL, I need a reliable method to check if that website uses Shopify.
The simplest way to check if a website is using Shopify is to inspect the website source, and look for code that only a Shopify store would use.
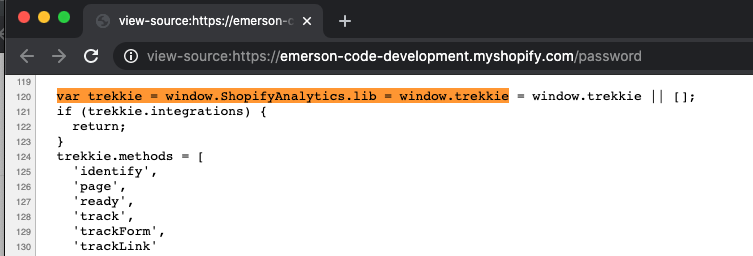
Now, I already know of such a snippet that is unique to Shopify stores: It’s ‘trekkie’ – which is what Shopify calls their custom analytics solution:
Cool. Let’s use that as a base point and start coding.
Let’s write a dead simple, 15 line, Ruby script to kick this off:
#~/desktop/is-shopify-store.rb

require 'open-uri'

# Prompt me for a URL
puts "What URL do you want to check?"
url = gets.chomp

# Open the URL I supplied above
html = open(url).read

# Checks the source code for the Shopify specific code snippet
if html.include? "var trekkie = window.ShopifyAnalytics.lib"
	puts 'This site uses Shopify'
else
	puts 'This site does not use Shopify'
end
Cool. Let’s run it, and try testing it against a couple websites to make sure it’s reliable:
First test using a Shopify site => https://emerson-code-development.myshopify.com
That worked. Let’s try a different Shopify website:
Second test with another Shopify site => https://allbirds.com
Once again, looking good. Now let’s try a website that definitely doesn’t use Shopify.
Third test with a site that doesn’t use Shopify => https://amazon.com
Error!
Ah, yes, I should’ve anticipated this but Amazon blocks my script from inspecting the website source code here.
Now I could get crazy and break out a more sophisticated scraping solution like Watir but remember this is bootleg, so let’s think through that extra work for a second…
So if Shopify stores don’t block my script, can’t I just assume that if my script is blocked, that it’s not a Shopify store? Makes sense to me. Let’s do that:
begin
html = open(url).read
if html.include? "var trekkie = window.ShopifyAnalytics.lib"
puts url + ': This site uses Shopify'
# It's a match! Let's write it to a CSV
CSV.open("/Users/emerson/Downloads/results-shopify-stores.csv", "a") do |csv|
csv << [url]
end
else
puts url + ': This site does not use Shopify'
end
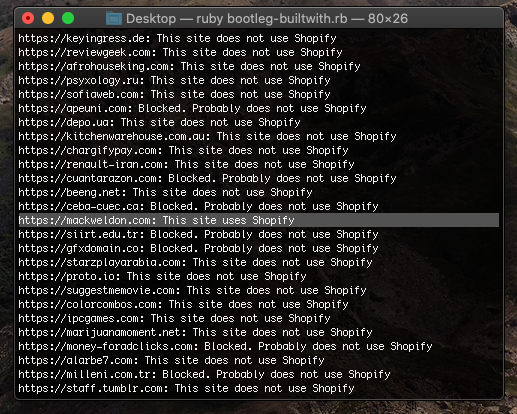
rescue
puts url + ': Blocked. Probably does not use Shopify'
end
Okay. Bingo. Part 1’s solution is decent enough.
Part 2: Get a big list of websites
Onto the next one: I need a massive list of domains to check.
Search engines typically use something called spiders here to find and create directories/lists of webpages. Spiders start at one webpage, follow all the links on that webpage, and then the links on those webpages, and so on until it has mapped all the webpages it can get its hands on.
Now if you wanted to build a Builtwith competitor you’d probably need to do something like that, but this is bootleg baby.
I remember Alexa.com has a list of the top million website domains or whatever. I wonder if they make the list publicly available? Surely that’d give me a lot of high ranking websites to check, and high ranked websites are what we’d prefer here anyway, right?
A quick google search revealed this Github thread with some decent leads, and from that thread I have a downloaded CSV of the ‘top million domains’.
Checking the spreadsheet, it only has 764,166 domains, not 1 million… Good enough!
Let’s start with a couple lines of Ruby code that can use a CSV spreadsheet file as an input, and loop through each domain to perform my Shopify check I outlined in part 1.
Oh yeah… the domain list only includes the URL’s base: Eg bestbuy.com, not https://www.bestbuy.com. That’s okay, let’s just assume most domains are using https:// and prepend it to the start of every URL before we check it:
url = 'https://' + url
Cool. One last thing. If my script does detect a Shopify store, let’s go ahead and save that to a separate CSV to serve as my output, so when my scripts finished, I’m left with just list of websites using Shopify.
if html.include? "var trekkie = window.ShopifyAnalytics.lib"
   puts url + ': This site uses Shopify'
   # It's a match! Let's write it to a separate CSV
   CSV.open("/Users/emerson/Downloads/results-shopify-stores.csv", "w") do |csv|
      csv << [url]
   end
else
...
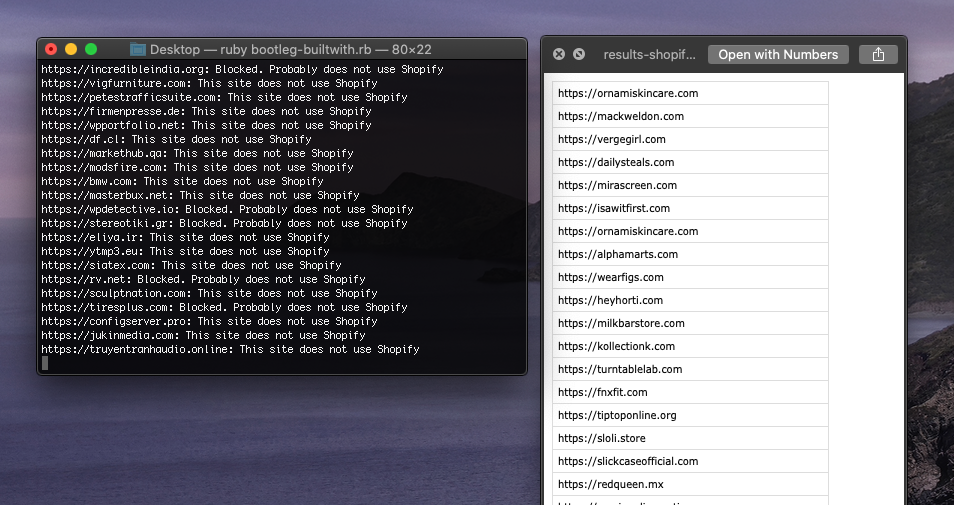
Okay… One hour later and I barely have gotten through 1000 URLs, and none of those are Shopify sites it seems.
Make sense. If you’re one of the top websites in the world, it’d make sense that you’d be using a custom platform to run it.
Given that, to make this a little bit easier, let’s go ahead and skip the first 50K top sites and start scanning at 50,001:
domainList = CSV.read('/Users/emerson/Downloads/top-1m.csv', headers:true)
domainList.drop(50000).each do |row|
    url = row[1]
    url = 'https://' + url
    isUsingShop(url)
end
A couple minutes later and we got one!
After letting that script run in the background for a few hours, I’ve checked about ~12K domains (Alexa’s top 50K-62K domains), and found ~220 of those sites are using Shopify. So 1.83% of the so far checked domains were using Shopify.
Quick and dirty math: Roughly 700K domains still need to be checked. Assuming similar positive rate as the domains I have checked so far, my bootleg script should produce a list of 10K+ high ranking Shopify stores.
Free BuiltWith: 50 high ranking Shopify stores
Free PublicWWW: 2359 high ranking Shopify stores
30 lines of Ruby code: 10K+ high ranking Shopify stores
Also, here is complete Ruby script:
require 'csv'
require 'open-uri'
def isUsingShop(url)
	begin
		html = open(url).read
		if html.include? "var trekkie = window.ShopifyAnalytics.lib"
			puts url + ': This site uses Shopify'
			# It's a match! Let's write it to a CSV
			CSV.open("/Users/emerson/Downloads/results-shopify-stores.csv", "a") do |csv|
			  csv << [url]
			end
		else
			puts url + ': This site does not use Shopify'
		end
	rescue
		puts url + ': Blocked. Probably does not use Shopify'
	end
end
domainList = CSV.read('/Users/emerson/Downloads/top-1m.csv', headers:true)
domainList.drop(50001).each do |row|
    url = row[1]
    url = 'https://' + url
    isUsingShop(url)
end
There is no perfect app, or productivity tool, that will solve all your problems.
Alfred for Mac though, is pretty damn cool, and certainly worthy of a mention.
Beware the overwhelm
Start off slow. Alfred has so many features that if you try to use them all out of the gate you will just get overwhelmed.
Okay, then what’s the ONE feature to sell me on Alfred?
The copy/paste clipboard. Do you use ⌘-C and ⌘-V?
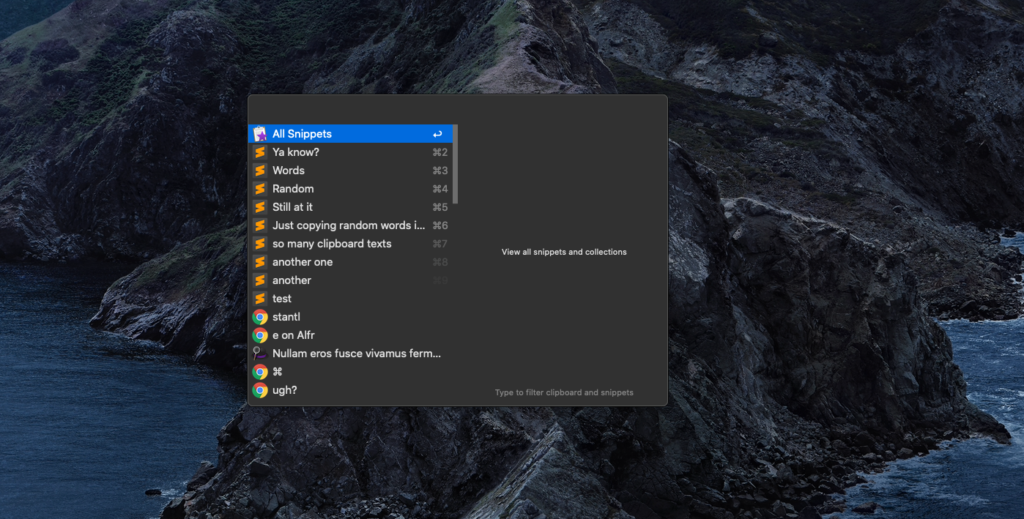
Well, with Alfred, when I press ⌘-Shift-V, instead of pasting instantly, I get this popup:
That’s right! Everything I’ve copied to my clipboard in the past X days (You can adjust how long clipboard history is stored for). I can even see what app it was copied from!
It’s easily searchable, and without a doubt my favorite feature of Alfred.
Incredibly useful to use almost as a little note tool – copy everything you might need at will, and access later in the day.
That looks like a neat feature! What else can Alfred do?
A lot of stuff. I (try to) make it a point to only automate tasks that are worth automating. As such, here are all the Alfred features I use daily, besides the clipboard history which I mentioned above.
Note: I unbinded the Apple spotlight search from ⌘+Space and binded it to alfred instead.
Now, whenever I press ⌘+Space, I get the Alfred window:
Within this little text box, here’s what I can do:
Quickly search for and open files (Built in)
Launch apps (Built in)
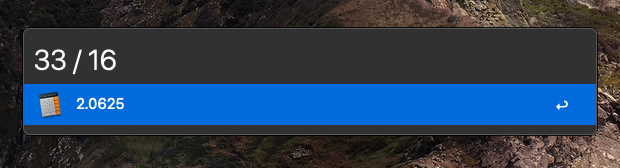
Calculator (Built in)
Need to run a quick math q? Just type it in
Connect airpods via Bluetooth: (Workflow) For when my airpods are connected to my phone and I want to connect to computer. Instead of going into my bluetooth settings and clicking connect, I just use this bad boy… One of my favorites.
Give: (Workflow)
This one opens my latest file in my downloads folder. So after I download something in my email or browser, instead of going to dock > opening finder > downloads > clicking file, I just type give and open that shit, saving me precious seconds every year.
When you start building apps for Shopify, one thing that isn’t clear is how you should config the apps in the Shopify admin.
I reached out to Ryan Kulp awhile back with this question, and he was kind enough to set me on the right path:
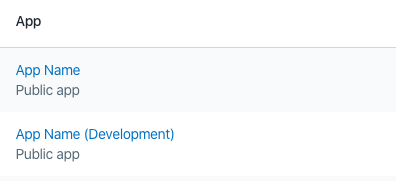
1. Create two Shopify apps in the admin, one for production/app store that points to heroku and one for development that points to ngrok/localhost.
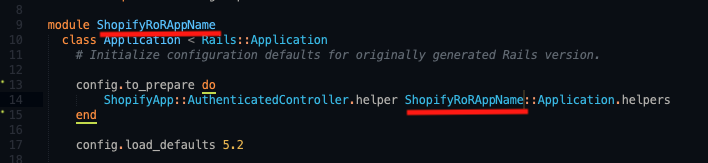
2. Then, in your RoR app within /config/initalizers/shopify_app.rb you want to use your development app keys for development and your production app keys for production (duh).
(You should accomplish this with env variables if you will be putting app code in repository.)
Then it’s as simple as developing in localhost w your development app, and when you’re ready to push those changes in production, run your git push heroku master terminal command
So you have an idea for a new business, app, whatever.
Great. If you’re like me, you’d hop on the domain registrar of your choice and figure out the perfect name.
This is a good way to have a pricey portfolio of useless names, as it is incredibly likely (1) it not being such a good idea after all or (2) the solution deviates from your original idea and the name no longer fits.
Do the hard stuff first and the fun stuff after. Easy to say, but not as easy to implement. I constantly need to remind myself of this.
Slate is a great tool for faster and more efficient Shopify theme development. However, if you want to bring a premium or existing Shopify theme to Slate, it requires a bit of extra work as the folder structure for Slate differs from the folder structure in the compiled Shopify theme.
Here is a guide for getting started with Slate theme development when you already have a pre-existing theme to work with, whether the theme was built from scratch or is from Shopify’s theme store.
0: Assumptions
You are using Mac OS X.
You are somewhat familiar with the Terminal and basic commands.
You will be using Slate v0.14 as at the time of writing this Slate 1.0.0 doesn’t have the ’slate migrate’ command.
You can alternatively use Yarn, but for this guide I’ll stick to NPM.
2: Download your existing Shopify theme
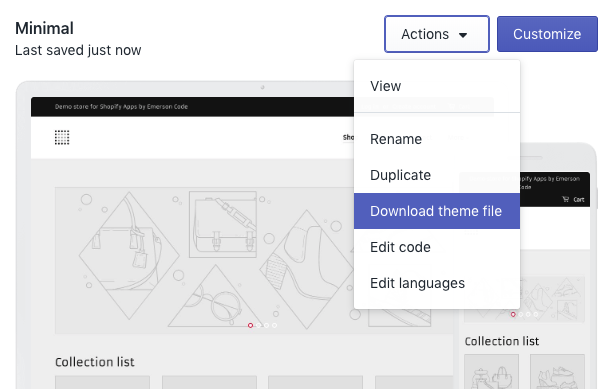
Once we have our pre-requisites installed, we now need to download the Shopify theme we want to use with Slate.
From your Shopify dashboard, navigate to Online Store > Themes. Find the theme you want and under actions select ‘Download theme file.’
The theme file will be sent to your Shopify account’s email, where you can download and unzip it.
While you’re there – You’ll want to grab the Shopify theme ID for that theme as well. I typically go to Actions > Edit Code and you can easily see the theme ID in the URL of the Shopify Theme Editor page. Write this down for later.
3: Get Shopify App API Token
Next, we need to get API keys for our Shopify account so Slate can connect to our store and manage our theme’s files.
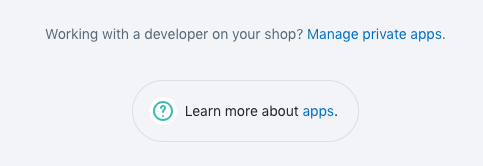
From the Shopify dashboard, let’s go to Apps > Manage private apps.
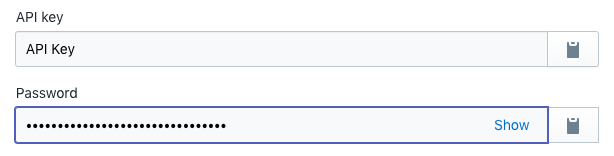
Create a new private app, name it whatever you’d like, and under “Admin API”, select “Read and write” option for the “Theme templates and theme assets” field.
After your new private app is created, you’ll be presented with some API keys. The only key you need is the password field. Show it and copy the API password for later.
4: Create a config.yml file within your Shopify theme folder root directory
Open Terminal and cd into your Shopify theme folder. Once you’re within the main theme folder, create and open a file called config.yml
nano config.yml
You’ll want to insert the following into the file, using your own password, theme_id, and store url data.
Now press, control-x for the exit command, making sure to press ‘Y’, followed by enter/return to save.
5: Initialize NPM
npm init
Follow the prompts, and a new file will be generated in the root of your Shopify theme folder called package.json. You’ll want to open the package.json file with the text editor of your choice or with Terminal. (nano package.json)
Within the root directory of your Shopify theme, run the following command in Terminal:
slate migrate
Proceed through the prompts until the migration is finished.
8: Turn Slate on and start developing
Within the root directory of your Shopify theme, run the following command in Terminal:
npm run start
If everything went right, you have now successfully converted your existing Shopify theme into a Slate theme which will allow you much faster development.